Tuesday 22 February 2011

5000 Visits - Best cheesecake ever to celebrate

As I'm about to have my visit #5000 I thought I'd celebrate with my favourite cake - Cheesecake. I know 5000 might not be that much (and half of them are probably myself), but for a small independent blog that started just as an extension to some recipes I posted on Facebook, I'm quite content. And to say thank you to everyone who has ever visited Skytte's Kitchen, I'd like to invite you for a slice of cake... if you make it yourself, obviously. I have tried various recipes for cheesecake, all good, but some a bit heavy, others a bit flavourless. But then I tried making a cheesecake I saw on Alton Brown's programme Good Eats, and bam! there was the perfect combination: Light (in texture, not in calories), creamy, flavourful. Try it out, you won't regret... Start by turning on your oven at 150ºC.

Ingredients:
Base:
35 Biscuits (Graham's, Marie, or Digestives)
120ml Melted Butter
1 tbsp. White Sugar
Cake:
350ml Sour cream
570g Philadelphia Cream Cheese
240 ml Sugar
80ml Cream
1 tbsp Vanilla
3 Egg Yolks
2 Whole Eggs
Topping:
Any jam of your liking

Start by crushing the biscuits finely. I used to put them in a plastic bag and hammer them with a rolling pin. The result is what you see in the picture: lots of big chunks. It's OK, but since I've got a food processor, It seems to do the job even more finely and leaving less a mess. Mix it with the sugar and the melted butter until it has the consistency of wet sand.

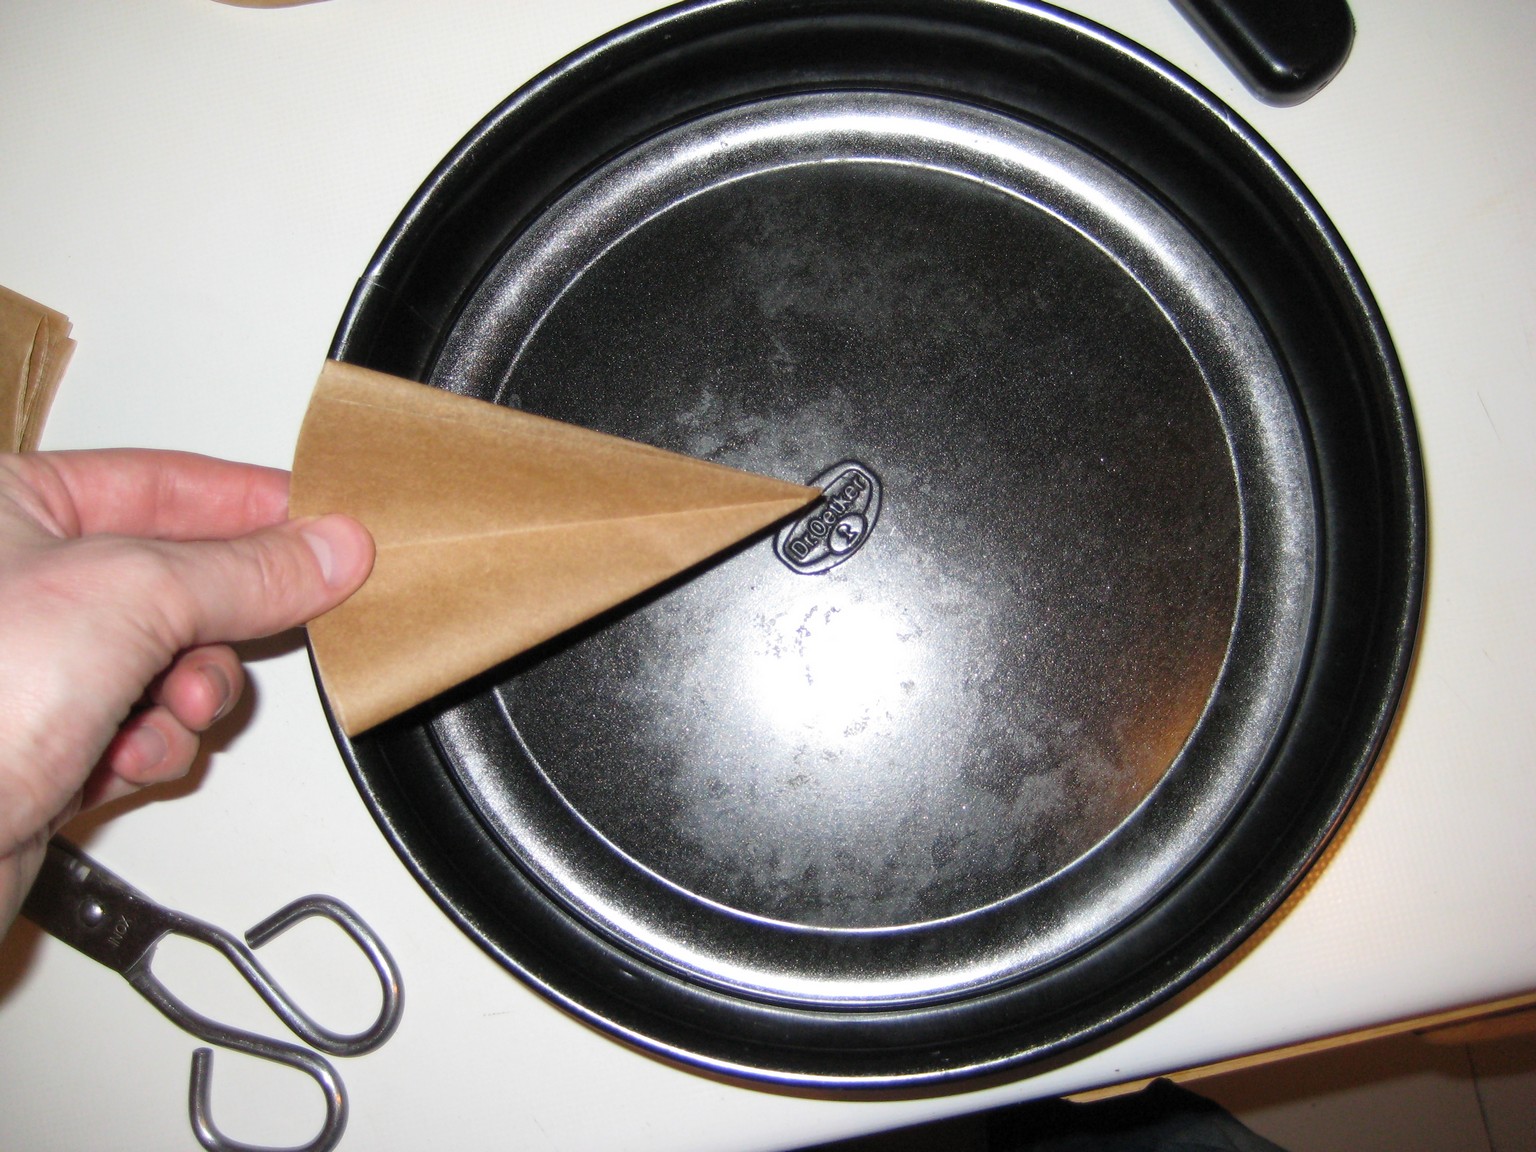
Get out your spring form, fold up a piece of baking paper and cut it at the radius of the form.
Unfold it and stick it to the base with a bit of water or butter. Cut a long strip for the sides. This will make it so much easier to remove the cake once done.

Put the biscuit mix in, hammer it down with the base of a glass so it's firm and equally thick all over. Bake it for 10 minutes at 150ºC.

Meanwhile, pour your sour cream into a bowl. Mix it for a minute at mid speed just by it self. this will help loosen it up.

Add the cream cheese and the sugar. Mix it well, first at slow speed, then at medium until smooth. Scrape down the sides and mix a bit more.

In a second bowl, mix the cream, vanilla, yolks and eggs. If the eggs are small, add another yolk. Beat well until smooth, light and creamy.

Pour half of the egg mixture into the cheese, mix and scrape down the sides. I keep insisting on scraping down the sides and bottom as you might have lumps of unmixed cheese. Then add the rest of the eggs and mix.

Pour over the baked biscuit base. Tap the whole thing lightly against the table so the bubbles will flow to the top. Reduce the heat of the oven to 120ºC. According to the original recipe you have to place the cake in a bain-marie. I don't have another recipient which is big enough to hold the spring form. If you do, great. Just make sure your spring form is water proof, or you'll have a soggy base. Bake at 120º for 1 hour. Then turn off the oven but leave the cake inside for an hour more. If you're a perfectionist the centre should have reached (but not surpassed) 65º. Take the cake out and let it cool down completely! It might seem a bit soft but that should all be good once it settles.

Spread out any jam of your liking on top, remove from the spring form, peel off the baking paper on the side and cut it with a clean knife. To get perfect slices every time, clean the knife and dip it in warm water between each cut. The result should speak for itself.

Sunday 20 February 2011

Remebering Bulgaria

If food is one of your criteria when choosing your holiday destination, Bulgaria is not to be missed. As I haven't been on the net, really, since last summer, here's a little post with some of the wonderful dishes we enjoyed on our gastro-holiday there last July. We flew to Varna, rented a car and drove all over eastern Bulgaria. Our first stop was the central town of Veliko Tarnovo. Here we ate better than anywhere else. If you go, do visit the Shtastlivetsa (Lucky Man) restaurant. Really good food, at the same low prices as anywhere in Bulgaria. Later we returned to Varna, which is turning into any other touristy beach destination. For the authentic Bulgarian cuisine, go inland. Here's some of what we had:

As a general trait, the menus are page after page of seemingly similar dishes. Expect to spend 15 minutes just going through the choices (e.g. one salad comes with egg, the next one is identical but without egg and has a different name). But the best way to start is to order a salad. They are base of any meal we had, and we've never tasted better tomatoes in our life. Living in Spain, that's something. I tried to copy it here.
In all the guides it says you have to try the shopska salad. We did, and it's fine. But they just had some many other interesting salads on offer. Many of which, like this with bacon, a poached egg, roasted red pepper an dbread, were a meal in themselves.
Shopska salad with roasted aubergine
Shopska with eggs.
Deep-fried potato cakes.

Croquettes
A selection of starters. We always ended up ordering much more than we could actually eat. As the salads are quite substantial, and all the starters really tempting, it's so easy to overdo your orders.
Chicken and asparagus salad. Great for the children.
Different dips. Tomato and spices, red roe, and yoghurt and dill if I remember right.
The main courses are really good as well. They are often cooked in small earthenware pots called sash. I wanted to buy some, but only found them in high-priced tourist shops.
My beautiful girlfriend enjoying stuffing herself. Even the local wine was surprisingly good.
Mushroom and potato 'yobaché' (sorry, if I don't spell the words correctly)
Chicken and cheese guyvetch which tasted a whole lot better than it sounded and looked.
Enjoying fish on a pirate ship (!) at the seaside town of Burgas.

Even the local fast food restaurant chain Happy Bar and Grill served pretty tempting dishes.

Luckily, the Bulgarians are not big on dessert. There's simply no space left after dinner. They do, however, have lots of ice cream stands everywhere for those afternoon strolls.

Pork tenderloin stuffed with dates and hazelnuts

The pork tenderloin is in itself a wonderful little piece of meat, but with this simple recipe you'll turn it into something truly spectacular. It's a great autumn or winter dish, and apart from tying the piece together (which isn't hard at all) the rest is really dead-simple. Here's how:
Ingredients (3-4 people):
1 pork tenderloin
A handful of hazelnuts
A handful of pitless dates
A couple of twigs of fresh parsley
1/2 cup of freshly grated parmesan (not the pregrated stuff, please!)
Salt and pepper
Olive oil for frying
For the sauce:
1 tsp flour
Worstershire sauce
1 cup of cream

Turn on your oven at 180º. Start by removing the silvery line of connecting tissue and any excessive fat. Cut off the thin end, so you end up with a regularly sized piece of meat.

Place the cut-off end piece in a food processor along with the rest of the ingredients. Add a little pepper. Remember the parmesan is already salty, so don't add too much salt at this stage. Whiz it until you have a paste. You can add an egg white if it seems very dry. Don't have a food processor? Get out the old chopping board and start chopping.

Cut the loin down the middle but stop a couple of millimetres from going all the way through. Open it up like a book. Cut into each side of the opened piece of meat, to open it even further. You can now give it a couple of superficial, diagonal slashes, place a piece of cling film on top and hammer it flat with the base of a pan or any other heavy piece of kitchen equipment. This will do two things; 1) the meat will extend more and 2) it will become equally thick all over which allows for an even cooking time (one of the golden rules of cooking).

Turn it over and place a "sausage" of the filling down in the middle. Roll it up. Don't worry if stuffing comes out the ends - it almost always does. Make a loop on a piece of kitchen twine. Tie one end of your rolled up meat together and then just, carefully, tie the rest of the meat together. If you're a fancy chef, there are elaborated ways to do this, but trust me, even the simplest of knots won't affect the taste. You just want to prevent the meat from opening up.
Season the meat well and sear it until its brown on all sides in a frying pan. Finish it off in the oven for 20-30 minutes at 180º, depending on the size of your piece of meat. If you have a oven thermometer, the internal temperature should reach 72º. When finished, take it out, wrap it in tinfoil, while making the sauce. The sauce is made by simply adding a teaspoon of flour to the pan the tenderloin was cooked in, add a bit of extra oil if it's very dry. Don't worry about any stuck pieces of meat, this is all part of the fond. Fry the flour for a minute until it starts sticking to everything. Then pour in splash of worstershire sauce, and a cup of cream. Stir constantly while heating it slowly. Taste for salt and pepper.

Remove the twine and cut the end bits off. Cut the rest into 3 or 4 pieces. Serve with the sauce, rice or potatoes and a nice, fresh salad.

Friday 11 February 2011

Short recipe for short bread

Keeping it simple --- and delicious. A quick and easy recipe for short bread. I'm using Dulce de Leche as my caramel filling, which is a reduction of sweetened milk. It has a very nice toffee taste and you'll probably be able to find it in your supermarket. If not, check out if there's any Latin-America food shop in your area. They will have it for sure. If not, you can try and make your own toffee by melting sugar, adding butter and cream, or boiling a can of Condenced Milk (pinch the seal, place in bain marie for 60-90 minutes, the whisk it), but that's an entire different post. The rest is very easy.

Ingredients:
Base:
170g butter at room temperature
50 grams sugar
1/2 tsp. vanilla extract
210 white flour
1/8 tsp table salt
Topping:
400g Dulce de Leche
170g Dark chocolate
1 tsp butter

Beat the softened butter with the sugar and vanilla until light and fluffy. Mix in the flour until it just sticks together like a ball.

Roll it out on a piece of lightly floured baking paper. It should be about 0,5cm thick. Bake for 20 minutes at 170ºC.

Let it cool down for a few minutes. Spread out a layer of Dulce de Leche.
Chop and melt the chocolate slowly with the teaspoon of butter. Microwave is good for this, if you do it in short intervals, stirring it between each blast. Careful not to over heat the chocolate. You just need it to melt, no more. Spread it out over the Dulce de Leche. Let it cool down. Before the chocolate hardens too much, cut it in squares with a sharp knife.

Keep them in the fridge so the chocolate is nice and crunchy when you bite into them. But be warned: They are highly addictive.

Monday 7 February 2011

Frozen Yoghurt - As simple as 1, 2, 3...

When I did a bit of investigation into how frozen yoghurt was made I came across a lot of quite elaborate and time consuming recipes for something, which by it's very name should be nothing more than just that... FROZEN yoghurt. Luckily, it's actually as simple as that. So time to get your ice cream churner out and start making a delicious, tangy alternative to ice cream. Whereas you can make this recipe simply by freezing the yoghurt, it tends to get hard and crystalize more if you don't use an ice cream maker. Using the ice cream maker improves the crystalisation process of the water in the yoghurt with a smoother texture as a result. If you haven't got one, get one. They are quite cheap and your kids will love you for it.

Ingredients:
Yoghurt: (about a cup per person), preferably greek which is creamier
Sugar: (depends on how sweet the youghurt is and how you like it, maybe 1/2 tbsp. per person)
Flavour: I used vanilla, other options; jam, shredded chocolate, finely chopped or mashed fruit.

First of all, put the frost bowl for the ice cream maker in the freezer at least 24 hours in advance. Mix the sugar and flavour into the yoghurt. Let it sit for 20 minutes in the freezer. This will do 2 things: 1) Let the sugar disolve. Remeber to stir again. 2) It will churn faster.

Pour the very cold yoghurt into the ice cream maker while the blade is moving. Churn for about 10-20 minutes or until creamy as soft ice.

Serve as is, or place it in the freezer for 30 minutes to an hour to firm up a bit more.

Wednesday 2 February 2011

Arriba Arepas! (Back to blogging, finally)

Hello again!!! I've finally got back on the Internet after months of only having some awful mobile connection. So it's time to start posting recipes again. We moved out of our old flat back in November and, after much renovation, we're slowly beginning to think of our new place as a home. Unfortunately, I have to admit that the kitchen is probably my least favourite part of our new flat. I still can't find things when I need them, we've got a vitro-ceramic cooker in stead of the old faithful gas stove and there's a serious lack of table space for chopping and preparing food. On the upside, I love the oven where I can finally controle the temperature beyond warm, hot and extremely hot.

Well, time to get cooking. I'll start off with a recipe for Arepas which I made ages ago. If you don't know what arepas are, they are a kind of corn bun from Venezuela and Colombia. You can fill them with anything you'd normally put in your buritos or tacos. I'm terrible sorry I can't remember the exact measures, but I think I usually go by feeling anyway. The dough should bind together without being neither too dry, nor too wet. That probably doesn't mean much, but you can always look at the bag of flour. It has the ratios.
Ingredients
Precooked corn flour (Harina P.A.N.; not the fine kind, but the one that resembles sand in texture, in a yellow bag)
Milk
Butter
Fresh sweet corn (Optional)
Chopped scalion (Optional)
Salt
Shredde cheese (Optional)
Filling according to taste

Warm up the milk untill it just stats to simmer. Add a spoonful of butter into the milk and lt it melt.
Mix the flour and the rest of the ingredients.

Pour over the milk, mix it and press it together to a ball with your hands. Leave it to rest 10 minutes. Remember the flour will absorb the liquid, so better add a bit too much than too little.

Shape the dough by hand into flat patties the size of hamburges. Wet your hands a bit to smooth ot the edges and any cracks in them.

Fry them in oil. Don't touch them straight away or they will stick to the pan. Let them form a crust.

Flip them over once they are golden.

Tap them with a bit of kitchen paper to remove any excess grease. Cut a pocket in them and fill them with chicken, cheese, lettuce, guacamole or whatever you desire.